Explanation
In this example, the goal is to add days to a date. This is a frequent task in Excel when you need to calculate a new date by adding a specified number of days to an existing date. Here are some examples of situations where this might be useful:
- Calculate a due date by adding a given number of days to a start date.
- Determine an expiration date by adding days to the manufacturing date.
- Schedule a follow-up appointment by adding days to the initial appointment date.
- Calculate the end date for a contract or legal agreement.
The article below provides several examples of how to set up a formula like this in Excel and notes some potential issues you may encounter.
About Excel dates
In Excel, dates are stored as serial numbers that begin with 1. For example, January 1, 1900, is the number 1, January 2, 1900, is 2, and so on. As I write this, the current date is May 28, 2024, which is stored as the serial number 45440. Because Excel dates are just numbers, you can perform arithmetic operations on dates, such as adding or subtracting days to get a new date.
Simple example
In the simplest case, you can hardcode the number of days directly into a formula. For example, with the date January 1, 2024, in cell A1, you can use a formula like this to add 14 days to the date:
=A1+14 // returns 15-Jan-2024
The result is January 15, 2024, which is the date 14 days after January 1, 2024. The formulas below the result of adding a different number of days to the date January 1, 2024, in cell A1:
=A1+1 // returns 02-Jan-2024
=A1+2 // returns 03-Jan-2024
=A1+3 // returns 04-Jan-2024
=A1+7 // returns 08-Jan-2024
=A1+14 // returns 15-Jan-2024
=A1+21 // returns 22-Jan-2024
Remember that “under the hood” Excel performs this arithmetic with large serial numbers. Because January 1, 2024, is stored as the number 45292, the actual math operation looks like this:
=45292+1 // returns 45293
=45292+2 // returns 45294
=45292+3 // returns 45295
=45292+7 // returns 45299
=45292+14 // returns 45306
=45292+21 // returns 45313
Excel then displays the large numbers as dates using a date number format .
Example with a cell reference
Of course, you can easily set up a formula to use a cell reference that contains the days to add. In the worksheet shown, we are not hardcoding days into the formula. Instead, we are picking up the days entered in column C with a cell reference. The formula in cell E5 looks like this:
=B5+C5
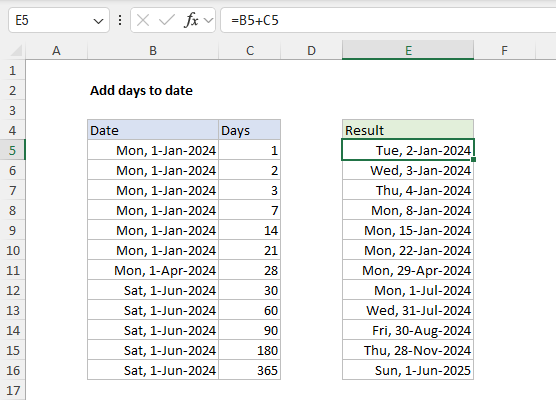
As the formula is copied down, the days in column C are added to the dates in column B. The resulting dates can be seen in column E.
Note: the dates in columns B and E are formatted with the custom date format “ddd, d-mmm-yyyy” to show the day of the week (e.g. Mon, Tue, etc.) along with the date.
Subtracting days from a date
As you might guess, you can subtract days from a date as well. To subtract 7 days from the date 1-Jan-2024 in cell A1, you can use a formula like this:
=A1-7
The result is Mon, 25-Dec-2023. If you use cell references for days, you will find it easier to keep the original formula based on addition (+) and enter the days as a negative number. You can see the result in the worksheet below, where the formula in cell E5 is:
=B5+C5

The original formula is the same, but the negative day numbers “subtract” days from the date in column B. This approach is more flexible since you can enter negative or positive days.
Days from today
If you want to add days to the current date, you can use the TODAY function . For example, to add 10 days, you can use this formula:
=TODAY()+10
This formula will return a date 10 days from today. Note that this formula will continue to calculate on an ongoing basis because the TODAY function will always return the current date.
Add workdays to date
There are many situations in business where you need to add a specific number of business days to a date, automatically skipping non-working days like weekends and holidays. In these scenarios, you can add days with the WORKDAY function or its more flexible sibling WORKDAY.INTL . For example, to add 5 business days to a date while excluding Saturdays and Sundays, you can use a formula like this:
=WORKDAY(A1,5) // add 5 working days
For a detailed explanation of using the WORKDAY function like this, including the option to skip holidays, see Add business days to a date .
Same date next month
If you want to add days to date and end up on the same day next month (or in 6 months) you will have trouble calculating how many days you need to add. Instead, you should use a different approach based on the EDATE function . With a valid date in cell A1, you can use EDATE to return a date 1 month, 3 months, and 6 months from the date like this:
=EDATE(A1,1) // same day in 1 month
=EDATE(A1,3) // same day in 3 months
=EDATE(A1,6) // same day in 6 months
The EDATE function can travel forward or backward in time based on the number of months provided. The EOMONTH function works in a similar way to EDATE but will always return a date at the end of a month .
Potential issues
Although adding dates in Excel is simple, there are several potential issues you may encounter.
- Date Formatting: Make sure cells that contain dates are formatted as dates. If not, Excel might display the result as a serial number. To format a cell as a date: Use the keyboard shortcut Control + 1 to open “Format Cells”. Select “Date” from the list of formats. Choose the desired date format and click “OK”.
- #VALUE error: if your formula results in a #VALUE! error, it may be that Excel does not correctly understand the date you are adding days to. If Excel sees a date in cell A1 as text, a formula like =A1+1 will return #VALUE! To fix this problem, take steps to make Excel read the dates correctly .
- Negative result: If you end up with a negative date value (i.e. a negative serial number) Excel will not display the number as a date. Instead, you will see a string of hash characters like #######. To fix this problem, adjust the formula or the dates to return a positive result.
- Excel Date Limitations: Excel handles dates from January 1, 1900, to December 31, 9999. Adding days to a date that results in a date outside this range will cause Excel to display a string of hash characters like #######.
Explanation
In this example, the goal is to add hours in decimal format (i.e. 1, 2, 3, etc.) to an existing Excel time. The complication is that Excel stores time as fractional values. The number 0.25 makes sense when you consider that 6 hours is one-quarter of a day, and a day in Excel equals 1. But it isn’t the way most people think about time. To add decimal hours to a time, we need to first convert the hours to an equivalent fractional value.
How Excel tracks time
In Excel, dates are serial numbers , so a single day has a numeric value of 1. As a result, time is a fractional value of 1 and 1 hour = 1/24 = 0.041666667. This means that 6 hours is one-quarter of a day (0.25), 12 hours is half a day (0.5), 18 hours is three-quarters of a day (0.75), and 24 hours is 1 day. In the same way, 6:00 AM has a numeric value of 0.25, 12:00 PM has a value of 0.5, and 6:00 PM has a value of 0.75. The table below summarizes this relationship:
| Hours | Time | Fraction | Value |
|---|---|---|---|
| 0 | 12:00 AM | 0/24 | 0 |
| 3 | 3:00 AM | 3/24 | 0.125 |
| 6 | 6:00 AM | 6/24 | 0.25 |
| 4 | 4:00 AM | 4/24 | 0.167 |
| 8 | 8:00 AM | 8/24 | 0.333 |
| 12 | 12:00 PM | 12/24 | 0.5 |
| 18 | 6:00 PM | 18/24 | 0.75 |
| 21 | 9:00 PM | 21/24 | 0.875 |
| 24 | 12:00 AM | 24/24 | 1.0* |
- In Excel, midnight (12:00 AM) has a dual nature: it has a value of 0 when it represents the start of a day, but it can be 1 inside a calculation t hat completes a full 24-hour cycle. In other words, as we approach midnight, the value of time approaches 1. But as we cross from one day to another, the 1 is added to the date, and time begins again at zero.
Adding decimal hours to a time
Because Excel stores time as fractional values, we need to convert decimal hours to a valid time before addition. To do this, we simply divide the hours by 24. For example, with an Excel time in cell A1, we can add 3, 6, 12, and 18 hours like this:
=A1+(3/24) // add 3 hours
=A1+(6/24) // add 6 hours
=A1+(12/24) // add 12 hours
=A1+(18/24) // add 18 hours
In the example shown, the formula in cell E5 uses the same idea above like this:
=B5+(C5/24)
As the formula is copied down, it adds the decimal hours in column C to the times in column B. The results in column E are formatted with the custom number format “h:mm AM/PM”.
With the TIME function
You can also add time values with the TIME function . To add 15 hours to a time in A1, use:
=A1+TIME(6,0,0)
The TIME function saves you from having to remember the formula for converting decimal hours to an Excel time. However, note that the TIME function only supports time spans up to 24 hours. Every 24 hours, the time will reset to zero like a clock. For example, the formulas below show what happens if we use 25 hours:
=TIME(25,0,0) = 0.041667 = 1:00 AM same day (1 hr)
=25/24 = 1.041667 = 1:00 AM next day (25 hrs)
The TIME function returns the equivalent of 1 hour, while =25/24 returns the full value.
Subtracting hours from time
You may get an error if you try to subtract hours from a time when the result is negative because Excel doesn’t support negative time values. One way to avoid this problem is to use a formula like this:
=MOD(time-(hours/24),1)
Here, the MOD function takes care of the negative problem by using the MOD function to “flip” negative values to the required positive value. Another way to avoid this problem is to start with a time that includes a date. This lets you subtract very large numbers of hours without any danger of getting a negative result. If you don’t want to see the date displayed in the result, just apply a time-only number format. For a more detailed discussion of this topic see Calculate hours between two times .
Working with dates + times
A good way to simplify formulas and avoid negative time values is to use a date that includes a time value, sometimes called a " datetime “, as the starting value. This lets you subtract a large number of hours without the danger of getting a negative result. You can see how this works in the worksheet below, where the values in column B contain a date and a time. The formula in cell E5 is the same as the original above:
=B5+(C5/24)
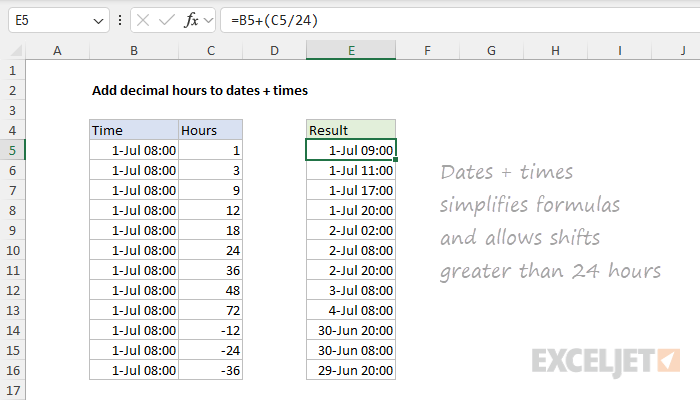
Because values in column B contain a date, the numbers are very large. For example, the numeric value in cell B5 is 45474.3333. As a result, we are able to add or subtract a large number of hours with one simple formula. Notice the results in rows 14-16 are valid and work fine. All values in columns B and E are formatted with the same custom number format:
d-mmm hh:mm
You can customize this format in any way you like.
