Explanation
In this example, the goal is to add minutes in decimal format (i.e., 1, 5, 10, etc.) to an existing Excel time. The complication is that Excel stores time as fractional values. The number 0.0104167 makes sense when you consider that 15 minutes is 1/96th of a day, and a day in Excel equals 1. But it isn’t the way most people think about time. To add decimal minutes to a time, we need to first convert the minutes to an equivalent fractional value.
How Excel tracks time
In Excel, dates are serial numbers, and a single day has a numeric value of 1. Since there are 24 hours in a day, one hour = 1/24 = 0.041666667, and 1 minute = 1/(24*60) = 1/1440 = 0.000694444. This means that 15 minutes is 1/96th of a day (0.0104167), 30 minutes is 1/48th of a day (0.0208333), and 60 minutes (1 hour) is 1/24th of a day (0.0416667). The table below summarizes this relationship:
| Hours | Minutes | Time | Fraction | Value |
|---|---|---|---|---|
| 0 | 0 | 12:00 AM | 0/24 | 0 |
| 3 | 180 | 3:00 AM | 3/24 | 0.125 |
| 6 | 360 | 6:00 AM | 6/24 | 0.25 |
| 4 | 240 | 4:00 AM | 4/24 | 0.167 |
| 8 | 480 | 8:00 AM | 8/24 | 0.333 |
| 12 | 720 | 12:00 PM | 12/24 | 0.5 |
| 18 | 1080 | 6:00 PM | 18/24 | 0.75 |
| 21 | 1260 | 9:00 PM | 21/24 | 0.875 |
| 24 | 1440 | 12:00 AM | 24/24 | 1.0* |
- In Excel, midnight (12:00 AM) has a dual nature: it has a value of 0 when it represents the start of a day, but it can be 1 inside a calculation t hat completes a full 24-hour cycle. In other words, as we approach midnight, the value of time approaches 1. But as we cross from one day to another, the 1 is added to the date, and time begins again at zero.
Adding decimal minutes to a time
Because Excel stores time as fractional values, we need to convert decimal minutes to a valid time before addition. To do this, we simply divide the minutes by 1440. For example, with an Excel time in cell A1, we can add 15, 30, 60, and 120 minutes like this:
=A1+(15/1440) // add 15 minutes
=A1+(30/1440) // add 30 minutes
=A1+(60/1440) // add 60 minutes
=A1+(120/1440) // add 120 minutes
In the example shown, the formula in cell E5 uses the same idea above like this:
=B5+(C5/1440)
As the formula is copied down, it adds the decimal minutes in column C to the times in column B. The results in column E are formatted with the custom number format “h:mm AM/PM”.
With the TIME function
You can also add time values with the TIME function . To add 90 minutes to a time in A1, use:
=A1+TIME(0,90,0)
The TIME function saves you from having to remember the formula for converting decimal minutes to an Excel time. However, note that the TIME function only supports time spans up to 24 hours. Every 24 hours, the time will reset to zero like a clock. If you try to add more than 1440 minutes to a time with the TIME function, only the remainder of the minutes divided by 1440 will be added. For example, 25 hours of time is 1500 minutes. Note how the results below differ:
=TIME(0,1500,0) = 0.041667 = 1 hour
=1500/1440 = 1.041667 = 25 hours
Also, TIME does not support negative values for minutes as seen in rows 14-16 of the example shown. If you try to use TIME with a negative number of minutes, it will return a #NUM! error.
Subtracting minutes from time
The easiest way to subtract minutes from time in Excel is to provide a negative number for minutes, as seen in the range C14:C16. This requires no adjustment in the formula explained above. However, you can also use a generic formula like this:
=A1-minutes/1440
Note that you may get an error if you try to subtract minutes from a time when the result is negative because Excel doesn’t support negative time values. This happens when the number of minutes being subtracted is larger than the original time value. One way to avoid this problem is to use a formula like this:
=MOD(time-(minutes/1440),1)
Here, the MOD function solves the negative problem by “flipping” negative values to the required positive value. Here, MOD works like a clock, wrapping the time around when it goes past 24 hours. When you subtract minutes and the result is negative, the MOD function essentially keeps subtracting from 24 hours until it reaches the correct positive time. This is how we naturally think about time - if we start at 1:00 AM and we go back 2 hours, we end up at 11:00 PM the previous day, not at -1:00 AM.
Note: This is a good example of “modular arithmetic”, sometimes called “clock arithmetic”. In modular arithmetic, numbers “wrap around” when they reach a certain value - just like hours on a clock wrap around from 12 back to 1. In Excel’s time system, the wrap-around point occurs at 1 (representing a full day), which is why the MOD function with a divisor of 1 works well for time calculations and appears often in other formulas .
Working with dates + times
Another way to avoid the problem of ending up with a negative time value is to start with a time that includes a date, sometimes called a " datetime “. This lets you subtract very large numbers of minutes without any danger of getting a negative result. You can see how this works in the worksheet below, where the values in column B contain a date and a time. The formula in cell E5 is the same as the original above:
=B5+(C5/1440)
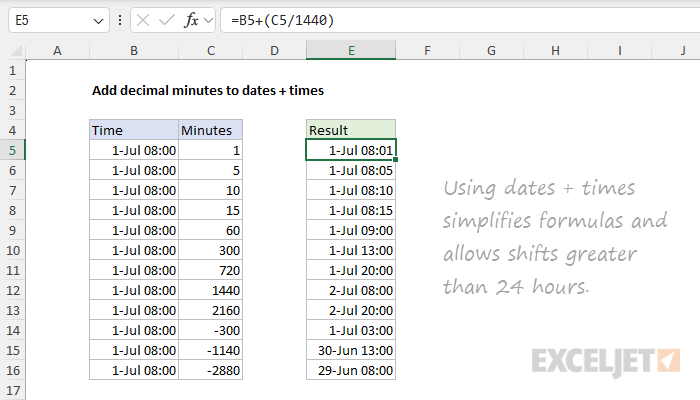
Because values in column B contain a date, the numbers are very large. For example, the numeric value in cell B5 is 45474.3333. As a result, we are able to add or subtract any number of minutes, even when the operation causes the date to change. All values in columns B and E are formatted with the same custom number format:
d-mmm hh:mm
You can customize this format in any way you like.
Explanation
In this example, the goal is to add a given number of months to a date. If the number of months is positive, the date should move forward. If the number of months is negative, the date should move backward. The standard solution for this problem in Excel is to use the EDATE function although in certain cases you may want to use the EOMONTH function instead. Both approaches are explained below.
The EDATE function
The EDATE function can add or subtract whole months from a date. You can use EDATE to calculate expiration dates, contract dates, due dates, anniversary dates, and other dates in the future or past. The generic syntax for EDATE looks like this:
=EDATE(start_date,months)
EDATE takes two arguments as follows:
- start_date - The starting date, which must be a valid Excel date.
- months - The number of months before or after start_date . A positive number will move the date forward and a negative number will move the date backward.
The EDATE function is fully automatic. Simply supply a valid date and a number for months and EDATE will return a new date. For example, if we give EDATE the date June 1, 2024, and the number 3 for months, the result is September 1, 2024:
=EDATE("1-Jun-2024",3) // returns "1-Sep-2024"
In the worksheet shown, we have a start date in cell B5 and a various number of months in column D. The formula in cell F5 looks like this:
=EDATE($B$5,D5)
Note that $B$5 is an absolute reference to lock this cell as the formula is copied down:
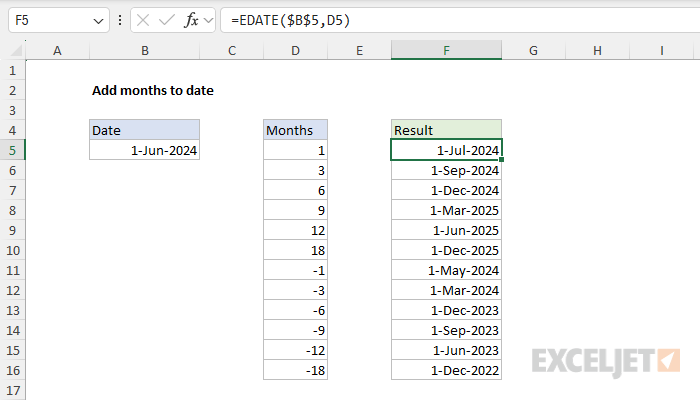
As the formula is copied down, it adds the months in column B to the start date in cell B5. The result in each row is a new date as shown. Notice that the positive month numbers in D5:D10 move the date forward in time and the negative month numbers in D11:D16 move the date back in time. If we change the start date in B5 to September 12, 2024, we get a new set of dates:
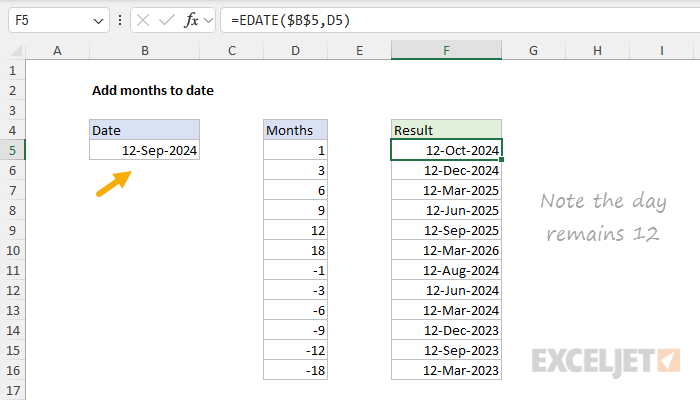
Note the output from EDATE keeps the day (12) from the start date.
The EOMONTH function
In specific situations, you may want to add months to a date and end up on the last day of the month, regardless of the starting day. In that case, you can switch from the EDATE function to the EOMONTH function . EOMONTH works just like EDATE, so it is a drop-in replacement. In the worksheet below, the formula in cell B5 is:
=EOMONTH($B$5,D5)
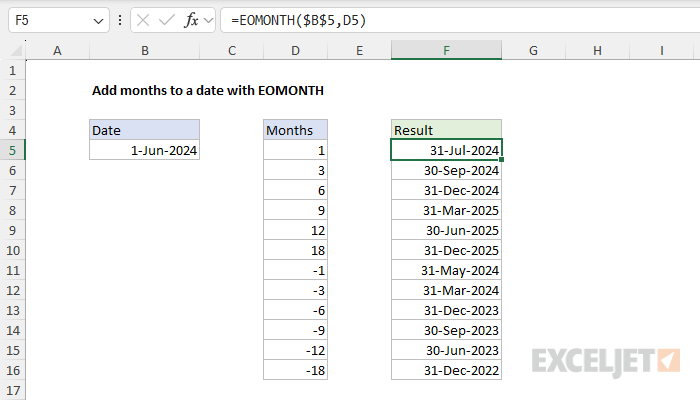
The result from EOMONTH is the same as EDATE except that all dates are at the end of the month . The day in the start date is not used.
Adding years
To add years to a date, you can multiply by 12 inside EDATE like this:
=EDATE(A1,12*10) // 10 years
=EDATE(A1,12*50) // 50 years
Excel will solve the multiplication first, then feed the result to EDATE as the months argument. For a more detailed discussion of this topic, see this page .
