Purpose
Return value
Syntax
=DROP(array,[rows],[col])
- array - The source array or range.
- rows - [optional] Number of rows to drop.
- col - [optional] Number of columns to drop.
Using the DROP function
The DROP function returns a subset of a given array by “dropping” rows and columns. The number of rows and columns to remove is provided by separate rows and columns arguments. Rows and columns can be dropped from the start or end of the given array. When positive numbers are provided for rows or columns , DROP removes values from the start or top of the array. Negative numbers remove values from the end or bottom of the array.
The DROP function takes three arguments: array , rows , and columns . Array is required, along with at least one value for rows or columns . Array can be a range or an in-memory array from another formula. Rows and columns can be negative or positive. Positive numbers remove values from the start of the array ; negative numbers remove values from the end of the array . Both rows and columns default to zero: if no value is supplied, DROP will return all rows/columns in the result.
Basic usage
To use DROP, provide an array or range , and numbers for rows and/or columns:
=DROP(array,3) // drop first 3 rows
=DROP(array,,3) // drop first 3 columns
=DROP(array,3,2) // drop first 3 rows and 2 columns
Notice in the second example above, no value is provided for rows.
Drop from start
To remove rows or columns from the start of a range or array, provide positive numbers for rows and columns. In the worksheet below, the formula in F3 is:
=DROP(B3:D11,6) // drop first 6 rows
The DROP function removes the first 6 rows from B3:D11 and returns the resulting array.
The second formula in F8 is:
=DROP(B3:D11,5,1) // drop first 5 rows and column 1
The DROP function removes the first 5 rows and column 1 from B3:D11 and returns the result.
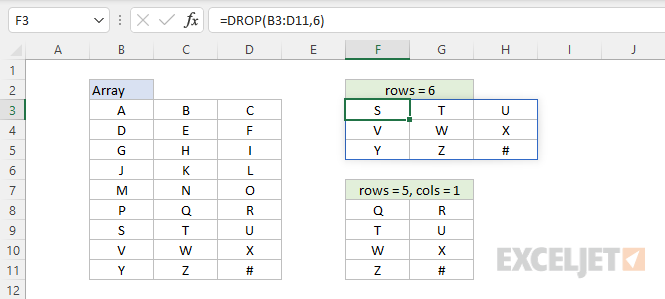
Notice that if a value for rows or columns is not provided, DROP returns all rows or columns. For example, in the first formula above, a value for columns is not provided and DROP returns all 3 columns as a result. In other words, rows and columns both default to zero.
Drop from end
To remove values from the end of an array, provide negative numbers for rows and columns . In the worksheet below, the formula in cell F3 is:
=DROP(B3:D11,-6)
With a negative 6 for rows , DROP removes the last 6 rows from B3:D11.
The formula in F8 is:
=DROP(B3:D11,-5,-1)
With a negative 5 for rows and a negative 1 for columns , DROP removes the last 5 rows and the last 1 column from B3:D11 and returns the resulting array to cell F8.

Notice in the first example, no value for columns is given and DROP returns all columns as a result.
DROP vs. TAKE
The DROP and TAKE functions both return a subset of an array, but they work in opposite ways. While the DROP function removes specific rows or columns from an array, the TAKE function extracts specific rows or columns from an array:
=DROP(array,1) // remove first row
=TAKE(array,1) // get first row
Which function to use depends on the situation.
Notes
- Rows and columns are both optional, but at least one must be provided.
- If rows or columns is zero, DROP returns all rows/columns.
- If rows > total rows, DROP returns a #VALUE! error
- If columns > total columns, DROP returns a #VALUE! error
Purpose
Return value
Syntax
=EXPAND(array,[rows],[columns],[pad_with])
- array - The array to expand.
- rows - [optional] The final number of rows. Default is total rows.
- columns - [optional] The final number of columns. Default is total columns.
- pad_with - [optional] Value to use for new cells. Default is #N/A.
Using the EXPAND function
The EXPAND function expands an array by adding rows and columns, which are supplied as separate arguments. The values given for rows and columns represent the dimensions of the final array, not the number of rows or columns to add.
The EXPAND function takes four arguments: array , rows , columns , and pad_with . Array is required, along with at least one value for rows or columns . Array can be a range or an array from another formula. Rows and columns must be positive numbers that are at least the same size as the given array . If not provided, both rows and columns will default to the dimensions of array .
Basic usage
To expand an array to be 5 rows by 4 columns, you can use EXPAND like this:
=EXPAND(array,5,4) // expand to 5 x 4
By default, any new cells created will be filled with #N/A errors. To expand an array to be 10 rows by 3 columns, and fill new cells with “x”:
=EXPAND(array,10,3,"x") // expand to 10 x 3, fill with "x"
Note that the numbers given for rows and columns represent final dimensions, not new rows and columns.
Default and custom padding
In the example below, we are adding 2 rows to an existing array with 5 rows. The result is an array with 7 rows. The formula in F3 is:
=EXPAND(B3:D7,7) // default padding

Notice that by default, EXPAND fills the new empty cells with the #N/A error. In the screen, the formula in F3 has been modified to provide zero (0) for the pad_with argument:
=EXPAND(B3:D7,7,,0) // pad with 0

Notice the new cells now contain zero. Also notice that because we are not providing a value for columns , we need to add another comma after rows , in order to place the zero in the right location as the pad_with argument.
Notes
- If rows is less than the row count in array , EXPAND will return a #VALUE! error.
- If columns is less than the column count in array , EXPAND will return a #VALUE! error.
