Question: What formula tells you if A1 contains the text “apple”?
This is a surprisingly tricky problem in Excel. The “obvious” answer is to use the FIND function to “look” for the text, like this:
=FIND("apple",A1)
Then, if you want a TRUE/FALSE result, add the IF function :
=IF(FIND("apple",A1),TRUE)
This works great if “apple” is found – FIND returns a number to indicate the position, and IF calls it good and returns TRUE.
But FIND has an annoying quirk – if it doesn’t find “apple”, it returns the #VALUE error. This means that the formula above doesn’t return FALSE when text isn’t found, it returns #VALUE:

FIND returns the position of the text (if found), but #VALUE if not found.

Unfortunately, this error appears even if we wrap the FIND function in the IF function.
Grrrr. Nobody likes to see errors in their spreadsheets.
(There may be some good reason for this, but returning zero would be much nicer.)
What about the SEARCH function , which also locates the position of text? Unlike FIND, SEARCH supports wildcards, and is not case-sensitive. Maybe SEARCH returns FALSE or zero if the text isn’t found? Nope. SEARCH also returns #VALUE when the text isn’t found.
So, what to do? Well, in a classic, counter-intuitive Excel move, you can trap the #VALUE error with the ISNUMBER function , like this:
=ISNUMBER(FIND("apple",A1))
Now ISNUMBER returns TRUE when FIND yields a number, and FALSE when FIND throws the error.

Another way with COUNTIF
If all that seems a little crazy, you can also the COUNTIF function to find text:
=COUNTIF(A1,"*apple*")
It might seem strange to use COUNTIF like this, since we’re just counting one cell. But COUNTIF does the job well – if “apple” is found, it returns 1, if not, it returns zero.

For many situations (e.g. conditional formatting) a 1 or 0 result will be just fine. But if you want to force a TRUE/FALSE result, just wrap with IF:
=IF(COUNTIF(A1,"*apple*"),TRUE)
Now we get TRUE if “apple” is found, FALSE if not:

Note that COUNTIF supports wildcards – in fact, you must use wildcards to get the “contains” behavior, by adding an asterisk to either side of the text you’re looking for. On the downside, COUNTIF isn’t case-sensitive, so you’ll need to use FIND if case is important.
Other examples
So what can you do with these kind of formulas? A lot!
Here are a few examples (with full explanations) to inspire you:
- Count cells that contain specific text
- Sum cells that contain specific text
- Test a cell to see if contains one of many things
- Highlight cells that contain specific text
- Build a search box to highlight data (video)
Logical confusion?
If you need to brush up on how logical formulas work, see this video . It’s kind of boring, but it runs through a lot of examples.
Other formulas
If you like formulas (who doesn’t?!), we maintain a big list of examples .
If you’re used to working with Excel on Windows, one of the most confusing aspects of using Excel on a Mac is shortcuts. Even basic shortcuts you’ve been using for years in Windows may not work as you expect.
After a few problems, you might wind up thinking that Mac shortcuts are “totally different” or somehow “broken”. In reality, Excel shortcuts on the Mac are quite capable, you just have to understand and adjust to certain differences.
In this article, I’ll walk you through the key differences you need to be aware of to work productively with Excel shortcuts on a Mac.
Also see: Excel shortcuts on the Mac //3-minute video
1. Special symbols
One of the more confusing aspects of keyboard shortcuts on the Mac is the symbols you’ll see for certain keys. For example, the Command key is abbreviated as ⌘, the Control key with ⌃, and the option key as ⌥. These symbols have a long history on the Mac, and you’ll find them in menus everywhere.
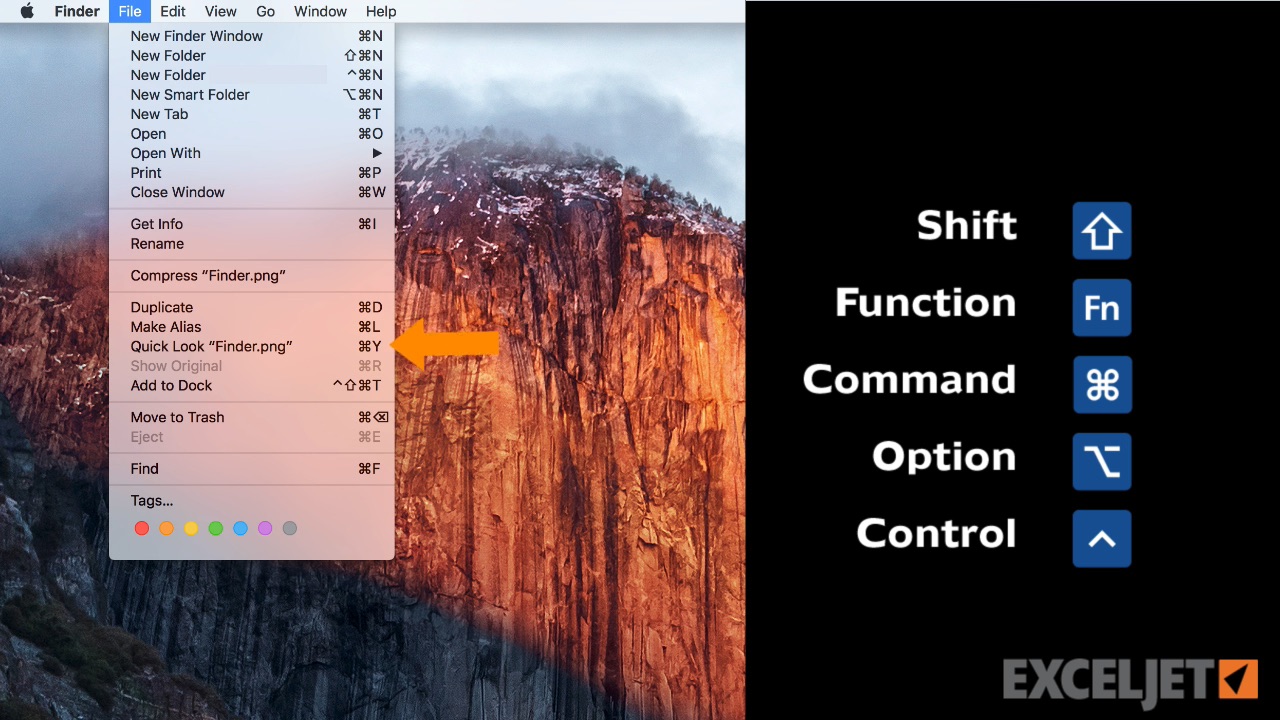
The Mac Finder – abbreviations appear in all applications, not just Excel
You’ll see these symbols in menus across all applications, so they’re not specific to Excel. There really aren’t too many symbols, so I recommend that you bite the bullet and memorize them. The table below shows some example shortcuts with a translation.
| Command | Shortcut | Translation |
|---|---|---|
| New workbook | ⌘N | Command N |
| Save As | ⌘⇧S | Command Shift S |
| Toggle ribbon | ⌘⌥R | Command Option R |
| Paste Special | ⌘⌃V | Command Control V |
| Select row | ⇧Space | Shift Space |
2. Function keys
Like their counterparts in the Windows world, Mac keyboards have function keys. These keys sit at the top of the keyboard and are labeled F1 to F12 on standard keyboards and F13, F14, and higher on extended keyboards.
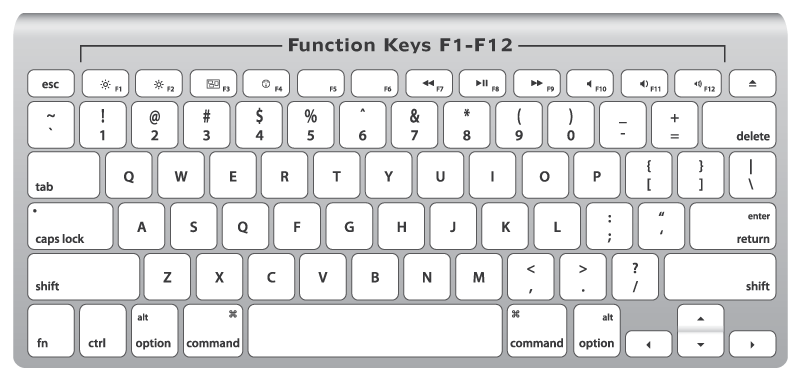
Standard Mac keyboard with 12 function keys
As you know, function keys are used for many shortcuts in Excel. For example, you can use F1 for help, F7 for spelling, and shift + F3 to insert a function. But if you try these shortcuts directly on a Mac, they don’t work. Why?
By default, Function keys on a Mac control the computer itself, things like screen brightness, volume, video pause and play, and so on. This means that if press only the function keys in Excel, you’ll end up controlling the Mac, and not Excel.
To make function keys work like you expect in Excel, you need to add a key: the function or fn key. You’ll find the fn key in the lower left on your keyboard. Here are a few examples:
| Command | Windows | Mac |
|---|---|---|
| New chart | F11 | fn F11 |
| Calculate worksheets | F9 | fn F9 |
| Open Spelling | F7 | fn F7 |
| Evaluate formula | F9 | fn F9 |
If you really hate using the fn key, you can change this behavior by changing a preference at System Preferences > Keyboard. Here you can check a box that will change function key behavior to work like “standard function keys”.

If you do this, however, note that you won’t be able to use function keys for things like Brightness, Volume, etc. unless you hold down the fn key. In essence, this setting reverses behavior so that you need to use fn to control the Mac.
Personally, I like using the function keys to control the computer, so I leave this setting alone, and just the fn key when needed in Excel.
3. Missing keys
Another difference that may trip you up on a Mac is certain keys are missing.
Unless you’re using an extended keyboard, keys like Home, End, backspace, Page up, and Page down are nowhere to be found. This is a problem because many of these keys are used in Excel shortcuts. The solution is to use specific substitutions, as shown in the table below.
| Windows | Mac equivalent |
|---|---|
| Home | fn arrow left |
| End | fn arrow right |
| Page Up | fn arrow up |
| Page Down | fn arrow down |
| Screen right | fn option arrow down |
| Screen left | fn option arrow up |
| Move to the Last cell | fn control arrow right |
| Move to the first cell | fn control arrow left |
| Delete | fn Delete |
| Backspace | Delete |
The substitutions let you perform the same actions you can do in Windows. However, They can make some shortcuts seem complicated on a Mac because you have to use more keys.
Note: If you’re using an extended keyboard on a Mac, you don’t need to worry about substitutions, since you’ll have keys for Home, End, Page up, etc.

Extended keyboards have all the keys
4. Ribbon shortcuts
In the world of shortcuts, perhaps the most painful difference on a Mac is a lack of ribbon shortcuts.
In Excel on Windows, you can use so-called accelerator keys to access almost every command in Excel using only your keyboard. This doesn’t matter much when you’re performing an action that has a dedicated shortcut (i.e. Control + B for bold), since dedicated shortcuts are faster than ribbon shortcuts. But when you want to trigger an action that doesn’t have a dedicated shortcut (like sort, hide gridlines, align text, etc.), it hurts a bit.
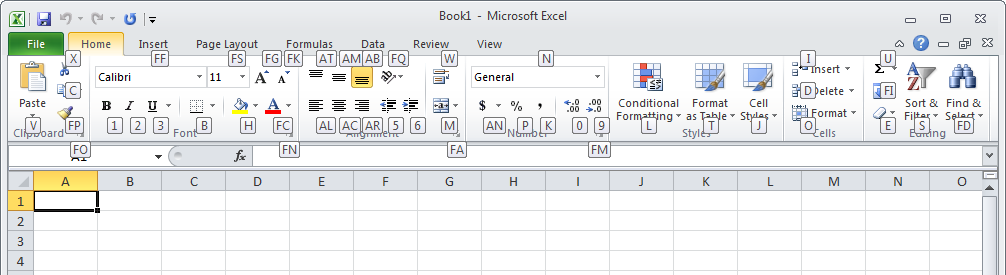
Excel ribbon in Windows with accelerator keys visible. No equivalent on the Mac!
Note: Accelerator Keys is a commercial product that makes it possible to drive the ribbon with the Alt/Option key using Accessibility features on Mac OS. Requires Catalina (10.15) or higher.
5. Just different
Finally, some Excel shortcuts are just plain different on a Mac.
For example, the shortcut for Edit Cell in Windows is F2, and on a Mac, it’s Control + U. The shortcut to toggle absolute and relative references is F4 in Windows, while on a Mac, its Command T. For a complete list of Windows and Mac shortcuts, see our side-by-side list .
If you want to see more Excel shortcuts for the Mac in action, see our video tips . Whenever we use a shortcut, we show both the Windows and Mac version.
Excel 365
With the introduction of Excel 365 on the Mac, Microsoft has started to align more Mac shortcuts with those on Windows, and many Windows shortcuts can be used Excel 365. For example, you can use F4 to toggle between absolute and relative references, Control + Shift + L to toggle a filter on and off, etc. So far, all the shortcuts that have been adjusted to match Windows shortcuts remain backwards compatible with previous Mac-only shortcuts. For example while F4 toggles references on the Mac in Excel 365, the old shortcut Command + T still works as well.
More shortcut resources
- 200 Excel shortcuts for Win and Mac (online list)
- The 54 Excel shortcuts you really should know (article)
- Laminated quick reference cards (old school)
- Excel shortcuts course - (video training)
